

How to Set Up a Revision Journal
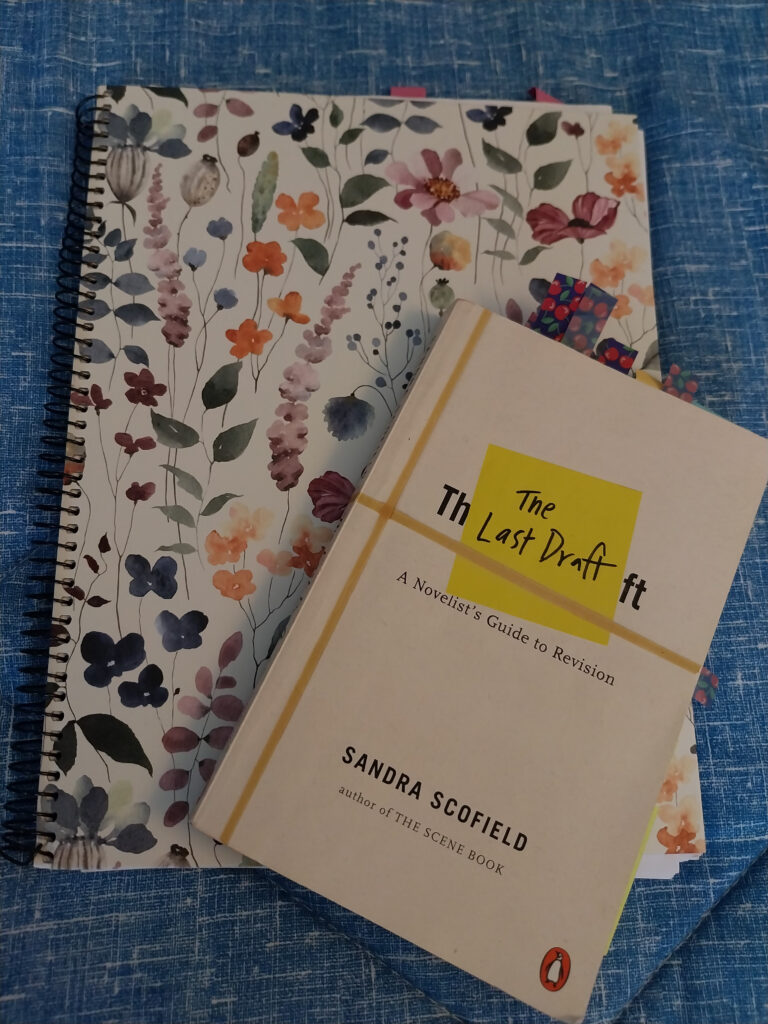
This month’s post is something of a continuation of last month’s post. There I discussed using Sandra Scofield’s excellent book The Last Draft to analyze the draft of my first novel. As part of that process, I set up a revision journal, and here I wanted to get into the specifics of how to set one up. Getting organized before you start can help you immensely in the long run.
What is a Revision Journal?
As the name suggests, a revision journal is a book where you keep track of thoughts related to a specific project you’re working on. Although you may keep notes in various places as you draft a book or other project, and you may follow Priscilla Long’s advice in her excellent The Writer’s Portable Mentor to reflect on your work each day, in this case what I have in mind is a specific notebook or journal where you only have thoughts related to a specific project.
What to Use for a Revision Journal
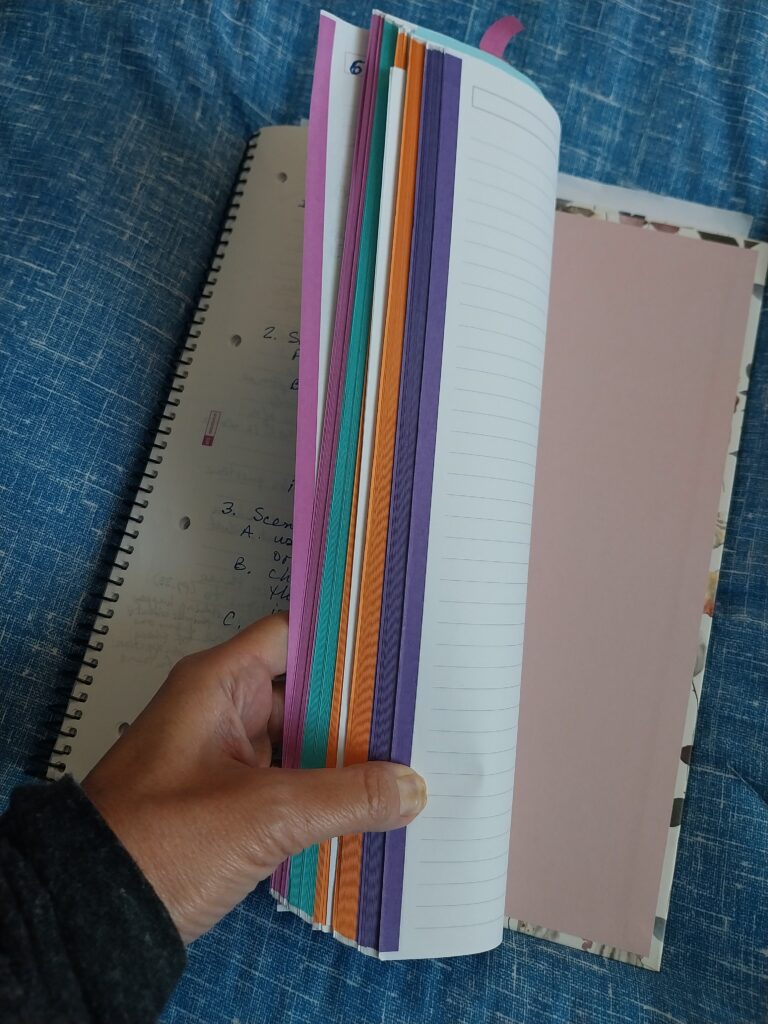
You can go as fancy or as simple as you like. Any notebook will do, although I used a lined Miquelrius one with four color-coded sections. I think this is my favorite notebook, ever. These notebooks may not be easy to find in the United States. They’re often printed with a grid format, so be careful before you order something if you, like me, have an aversion to that style. Obviously, if you have a notebook, you’ll be writing your entries by hand. I’m a big fan of handwriting but if it’s really not your thing, you can simply follow the steps below with your digital version. I think Scrivener would work well for this.
What’s most important is (a) going through the process and (b) having a record of your notes in one place. I personally feel like it’s easier to just open a notebook and flip through it but I know a lot of people prefer a digital format. Whatever works. As I said, actually creating a revision journal with the notes is the most important thing. The reason for this is that it gets you thinking about your work, which is the beneficial part. But you need to be able to remember what you thought along the way (trust me, you’ll forget). Write it down.
Revision Journal Sections
As I said above, I used a Miquelrius notebook which is divided into sections. Specifically, this notebook has four sections, each with thirty pages (front and back). At the moment, I’m only using three of the four sections, so I have a lot of room to expand. Each page of my notebook has a space to write a heading or title, and I strongly suggest you do that. For example, my Character List has “Character List” as the title, and I included a date as well.
Section 1
Miscellaneous items are included in Section 1 of my revision journal, but they each take only a few pages. These include the Table of Contents, Character List, Style Guide, Notes on Narrative Elements, Revision Plan/List of Tasks, and Playlist. Below I talk about each one of those elements.
Table of Contents
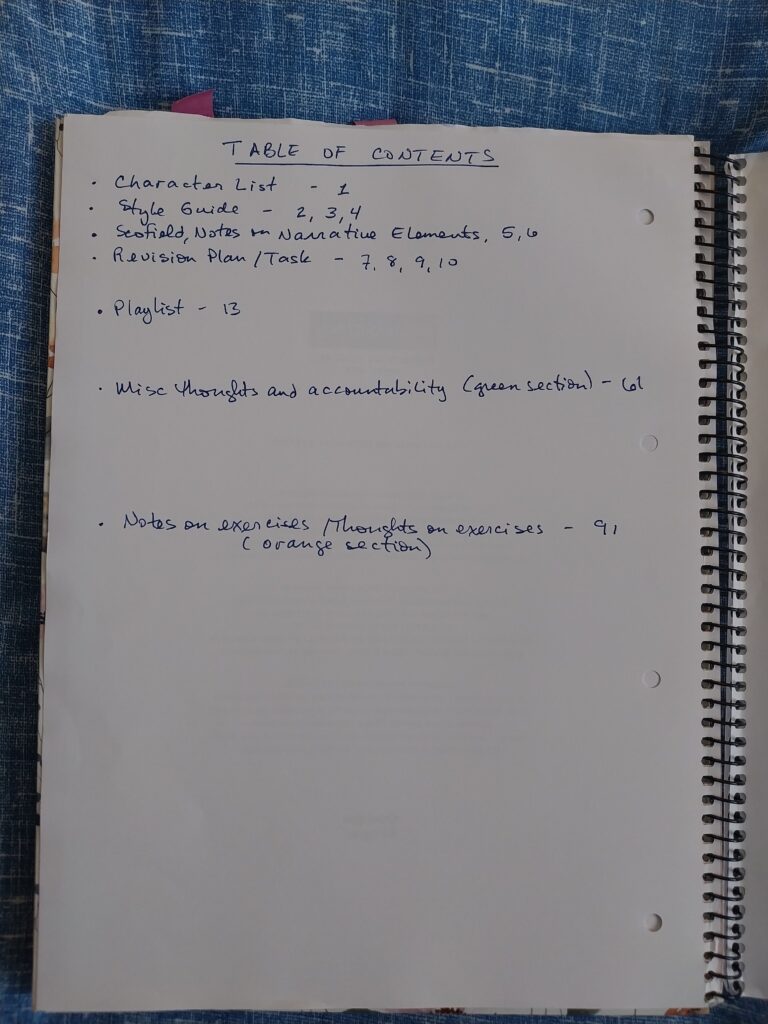
Leave room for a table of contents. Having one has been so useful! I must’ve had a flash of inspiration to think of including this, and I’m really glad I did. Of course, having a table of contents means you need page numbers. You don’t have to number all the pages now — the only thing you really need to do is number the beginning page of each section, then fill in the page numbers as you go along. My Table of Contents is on the inside front cover of my notebook, not on an actual page, so I don’t have to worry about it getting torn out and lost.
Character List
Well, a character list is pretty self-explanatory. Mine is one page long and I listed each character by their first and last name, with a short description, one line for each person. At the moment I have eighteen characters, with four others who only appear briefly. I will most likely cut out three of those eighteen characters. I know, I know. It seems like a lot of characters, but some are supporting characters.
Style Guide
I put my Style Guide right after my Table of Contents. A style guide is useful because you might have a character whose name is difficult to spell. You can pass on your style guide to editors so they know ahead of time what the correct spellings are. In my case, since my story takes place in New Mexico, one of the first things I listed in my Style Guide is the spelling of “chile,” because, contrary to what people outside of New Mexico are always trying to do, it is not spelled with an “i.” In New Mexico we have red chile, green chile, and Christmas (a mix of those two).
Notes on Narrative Elements
It was worth it to me to dedicate two handwritten pages to Notes on Narrative Elements. This is simply a few notes on that specific section of Scofield’s The Last Draft. I wanted to be able to find this information quickly, without having to search through Scofield’s book. I did, however, include the page numbers from her book in my own notes. For example, I have notes on scene fragments. If I want more information from Scofield’s book, I know that I can find it on page 26.
Revision Plan/List of Tasks
This part of the notebook, which I called the Revision Plan/List of Tasks, is basically a to-do list of things that I knew from the outset I needed to do (like reading my draft), as well as other things that have come up as I’ve worked on exercises. Another example is a note to delete three of the characters in my draft, because that requires a somewhat significant revision to my draft.
Playlist
While I haven’t totally set up this part of my revision journal, I did leave space for my Playlist. I have a partial playlist saved in Scrivener, divided by character, so at some point I’ll add that information here. Some of the songs I originally thought about using for a certain character turned out to be things that, in my mind, wouldn’t have worked, mostly because they’re songs that came out after the timeline of my book. This may not matter to you, but I want mine to be as true-to-life as possible.
Section 2
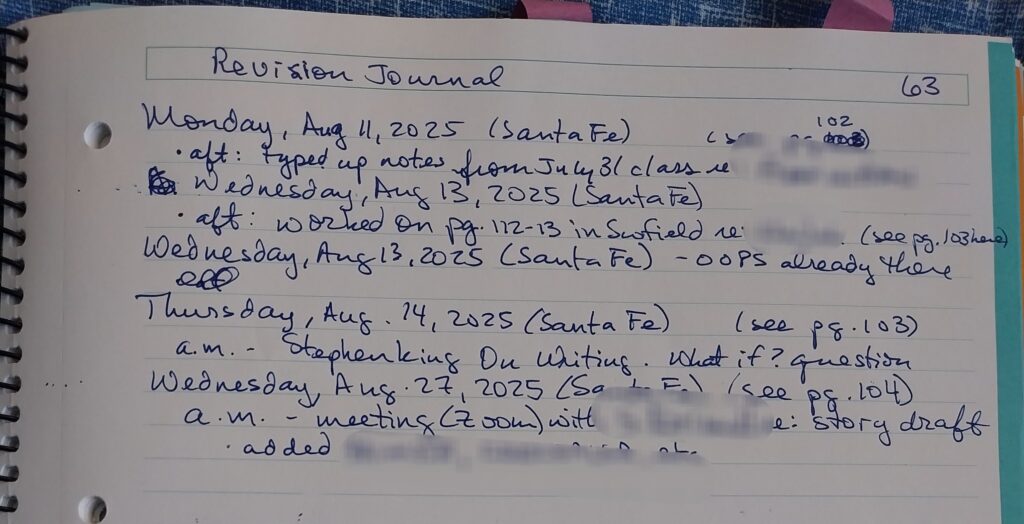
In Section 2, I have a kind of diary of revision activities. I was using this as a way to hold myself accountable and also keep track of what I did on each day I worked on revisions. I simply dated each entry then wrote what I did for that day. For example, looking back at it now, I can see that on Wednesday, July 16, 2025, I began setting up my revision journal. I also read most of the section on narrative elements from Scofield’s book.
Section 3
Section 3 is the real heart of the matter, because it’s where I have notes on all the exercises I’ve done so far on my draft. I talked about this in detail in last month’s post, so I won’t repeat myself here, but the majority of the exercises (but not all of them) have been from Scofield’s book. The only exercises which were done on pages not in my revision journal are my story summaries, which I handwrote, numbered with their own page numbers (e.g. B1, B2, etc.), but which I included in the Table of Contents. I simply placed those pages into this section of the revision journal.
Section 4
As I said above, Section 4 is blank for the time being. I envision it being rolled into Section 3 at some point.
My Happy Place
My revision journal is really my happy place. I feel inordinate satisfaction when I look at it, even if I just look at the cover and not the contents. My memories of making it are that good! It’s true that this particular project is on hold right now, but I’m just really happy whenever I think about the work I’ve put into my Revision Journal, which translates to time spent working on my draft. Even if that draft never goes forward another millimeter, writing it has been worth it, and creating this revision journal has been, too.
Do You Have Experience Setting Up a Revision Journal?
Do you have experience setting up a revision journal? How did you do it? Handwritten or digital? What things did you include and what suggestions do you have? Let me know in the comments below.
Pulling at Threads is my occasional newsletter. It always accompanies my blog posts. If you want more of an “insider’s” view on what’s happening in my reading and writing life (or just to get notified of the latest post), you can sign up here.